Writing A REST Application
A Quick Overview
A REST Application is simply a web service that responds to requests from Aculab Cloud with instructions for what to do next. These instructions are expected to be JSON objects, so we need to build a web service that speaks JSON.
The exact specifics for how we do this vary with the different web servers and languages available. For more information on the specifics of the implementation refer to the documentation for your chosen web server, and the API docs for your chosen language.
To keep things simple we are going to focus on inbound services. The process for writing an outbound REST Application is identical, the only difference is in how the service is invoked. For details on invoking outbound services you should refer to the web services documentation.
When a telephone call is started on Aculab Cloud the first thing the system does is look for a corresponding service. So we should start by creating an inbound service for our application. If you haven't already done so, go ahead and create a new inbound service. At this stage you can either attach a real phone number, or choose a SIP service name that we can call into in order to test the service.
Configuring Your Service
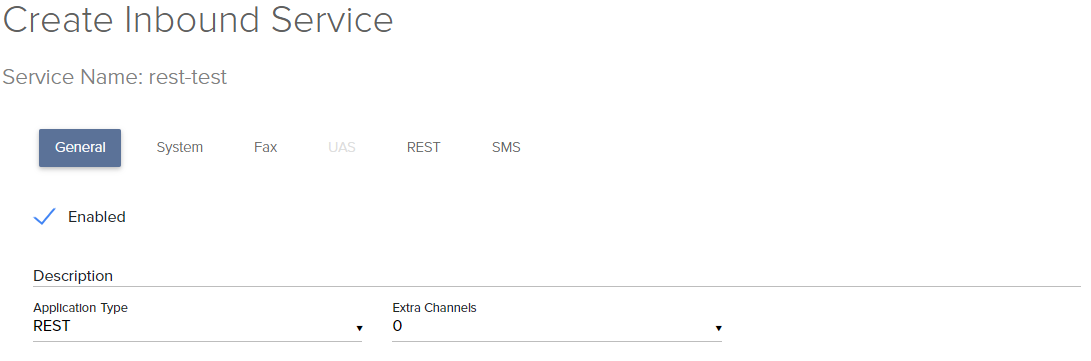
On the General tab when creating the service ensure the Application Server Type is set to REST:
Now go ahead and click the REST tab. You should see a simple form, with First Page, Final Page and Error page, each with a HTTP Request Method next to them. You should also see Application Parameters and TTS Voice settings options. Don't worry about these for now, we'll come back to them later.
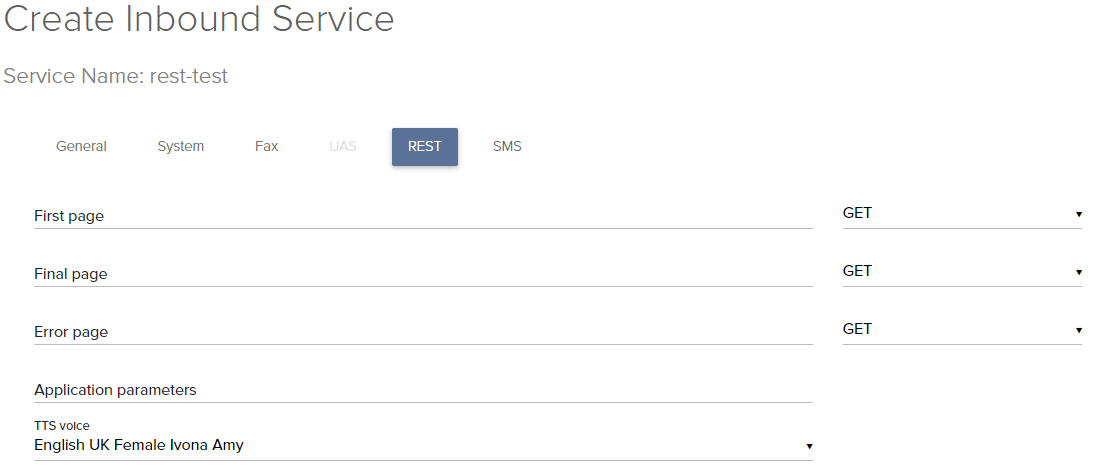
For now let's focus on those three 'Pages'. These are the three pages that the Aculab Cloud will call during the lifecycle of a telephone call.
When a call is received, Aculab Cloud makes a request to the First Page to get instructions on how to handle the call. This is your application's entry point. The First Page returns a list of actions to run, subsequent pages returning others. When a REST Application runs out of actions to run, the call ends.
When a call ends, Aculab Cloud makes a request to the Final Page. This is the opportunity for you to handle any post call jobs, such as logging the phone call. This page is always invoked after the call ends, regardless of how the call ended. You should consider sending a 204 no content response for this, failing that an empty JSON object is fine. For our examples we will use an empty JSON response, since that is something we can see on screen.
When an error occurs in handling a call, Aculab Cloud will make a request to the Error Page with details of the error. This information will also be captured and logged in your rest logs for you to analyse. The Error Page can respond with further actions to run or no actions in which case the call is automatically hung up.
This gives you your basic framework, and starting point for any REST Applications. To start with we should create these three pages to respond with suitable instructions to Aculab Cloud.
Your First Application
If you are writing your first Rest Application, a good starting point is the simple "Hello World" Application.
To do this you are going to want to write 3 pages;
- Your first page should return the JSON for the Play action, to simply say "Hello World"
- Your final page should return an empty response, a 204 is preferable, but empty JSON is acceptable.
- Your error page should return the JSON for the Play action to say "An error has occurred"
Once you have these three pages you have a (admittedly) simple but complete REST Application.
However, since nobody's perfect there is one more page that you should consider writing in order to make your life as a developer a little easier. Since Aculab Cloud will be calling your web service and Aculab Cloud speaks JSON you should consider adding a 404 page to respond with the JSON for a Play Action to say something like "I appear to have taken a wrong turn". This will make your development easier in the long run as a typo in a url isn't going to simply hang up on you.
Once your pages are written, you should go ahead and point your web browser at each of these three pages, and then a non-existent address.

You should get a JSON object similar to the following examples.
-
{ "actions": [ { "play": { "play_list": [ { "text_to_say": "Hello World" } ] } } ], "token": "your application token" } -
{} -
{ "actions": [ { "play": { "play_list": [ { "text_to_say": "An error has occurred" } ] } } ], "token": "your application token" } -
{
  "actions": [
    {
      "play": {
        "play_list": [
          {
            "text_to_say": "I appear to have taken a wrong turn"
          }
        ]
      }
    }
  ],
  "token": "your application token"
}
If you can't access these pages, then make sure your server is publicly available. Remember, we need to make requests from the Cloud to this server. This may involve opening external ports in firewalls and configuring port forwarding, or reverse proxies on a corporate network. If you're unsure if your site is publicly visible then you can use an online proxy tool, such as hide me to find out.
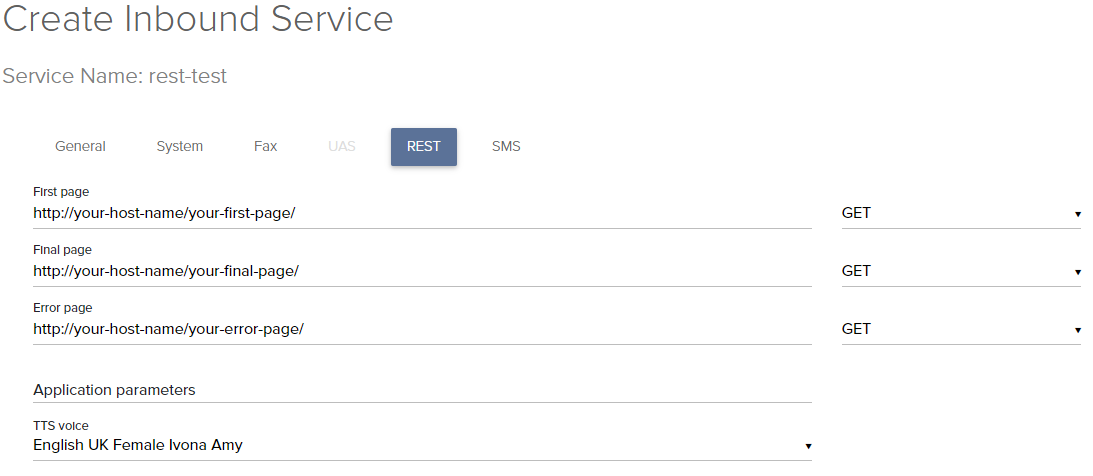
Once you are sure everything is visible to the outside world you should update the URLs on the REST tab of the inbound service to point at your web pages.
Now try a phone call. You can use the Cloud WebRTC client (that's the little cogs on the right of the inbound services table) to dial in and test your service. Once you've done that we can take a look at your REST logs.
The REST Logs
REST logs are organised by date, starting with the year, then the month and finally the day. They are sorted in time order so the most recent call should be at the bottom of the list. Go ahead and locate the log for the call you just made. Click the download link and open it up.
You should see something like the following;
2017-Sep-25 15:11:41 : Log for 0cde6d43364b5e5f.19011 started
2017-Sep-25 15:11:41 : Ring inbound for 2 seconds
2017-Sep-25 15:11:44 : Instance info for http://52.19.18.99/first_page: {
    "application_instance_id": "0cde6d43364b5e5f.19011",
    "log_filename": "2017/09/25/rest_15_11_41_0cde6d43364b5e5f.19011.log",
    "this_call": {
        "application_parameters": "",
        "call_direction": "in",
        "call_from": "blah@156.67.243.126",
        "call_id": "0cde6d43364b5e5f.19011.488636418",
        "call_state": "inbound",
        "call_target": "rest-test@sip-0-2-0.aculab.com",
        "call_to": "rest-test@sip-0-2-0.aculab.com",
        "seconds_call_duration": 0.0
    },
    "token": null
}
2017-Sep-25 15:11:44 : Create a new HTTP connection: Host 52.19.18.99: Scheme http
2017-Sep-25 15:11:44 : Page http://52.19.18.99/first_page responded with command {
    "actions": [
        {
            "play": {
                "barge_in": true,
                "play_list": [
                    {
                        "text_to_say": "Hello World"
                    }
                ]
            }
        }
    ],
    "token": "play text sample"
}
2017-Sep-25 15:11:44 : User token is: play text sample
2017-Sep-25 15:11:44 : Running actions: [u'play']
2017-Sep-25 15:11:44 : Call action play
2017-Sep-25 15:11:44 : Play TTS: Hello, good evening and welcome.
Straight away you can see the instance id for service invocation. This uniquely identifies this run of your application within Aculab Cloud. If you have issues this is a crucial piece of diagnostic information.
2017-Sep-25 15:11:41 : Log for 0cde6d43364b5e5f.19011 started
After this you can see the instance_info. This contains the application parameters that were passed to the application and information on the calling number the called number and the direction of the call.
2017-Sep-25 15:11:44 : Instance info for http://52.19.18.99/first_page: {
"application_instance_id": "0cde6d43364b5e5f.19011",
"log_filename": "2017/09/25/rest_15_11_41_0cde6d43364b5e5f.19011.log",
"this_call": {
"application_parameters": "",
"call_direction": "in",
"call_from": "blah@156.67.243.126",
"call_id": "0cde6d43364b5e5f.19011.488636418",
"call_state": "inbound",
"call_target": "rest-test@sip-0-2-0.aculab.com",
"call_to": "rest-test@sip-0-2-0.aculab.com",
"seconds_call_duration": 0.0
},
"token": null
}
A few lines later you can see the log section beginning with: Page <first page url> responded with command. This is your REST application's JSON.
2017-Sep-25 15:11:44 : Page http://52.19.18.99/first_page responded with command {
"actions": [
{
"play": {
"barge_in": true,
"play_list": [
{
"text_to_say": "Hello World"
}
]
}
}
],
"token": "play text sample"
}
After this you should see a log line similar to: Called final page <your final page url>. This is the response from your application's final page. As you can see this page didn't respond with any actions.
2017-Sep-25 15:11:46 : Called final page http://52.19.18.99/simple_play/final_page.
Congratulations, you've just finished your first simple REST application.
Further Configuration
Now we promised to come back to the other configuration options on the REST service configuration tab, so let's go back to the service and take a look now. Click on the name of the service we created earlier. Then click the REST tab. You should see the REST settings page from earlier.
Hopefully, that first one makes a bit more sense after reviewing the log. You probably noticed the instance info block contained an empty application_parameters entry. This is where you can add data to pass to an application. That information is then available to you in the web server as either parameters for a GET or post data for a POST. The specifics of how you access this vary from server to server so we won't go into detail here.
That final option, TTS Voice, allows you to set the default voice for your TTS statements. When you create a Play action you have the option to specify the voice you want to read the text in. Since most applications will stick to a single voice, it's simplest for you to specify that voice as the default, and not worry about repeatedly specifying it everytime you make a request to read some text. Have a play with the voices now, choose a new voice and make another call. Keep playing until you find something you're happy with, but remember to pay attention to languages, otherwise the output may not make much sense.
Building Bigger Applications
At this point you have all the essentials you need to understand the basics of writing a REST application. You want to get on to bigger and better things, so now you need to think about how you design your REST applications. A simple way to think about your apps is to view your call like a flow chart. Your chart begins with a call arriving at your system, this is where your first page is invoked. From here you either move straight on to a next page using a Redirect action, or you offer your users a choice with a Run Menu action. Continuing on until you eventually reach the end of the call, the Hangup action. As you build up your flow chart you can quickly begin to see how each set of actions defines a page in your application.
Take a look at the following example:
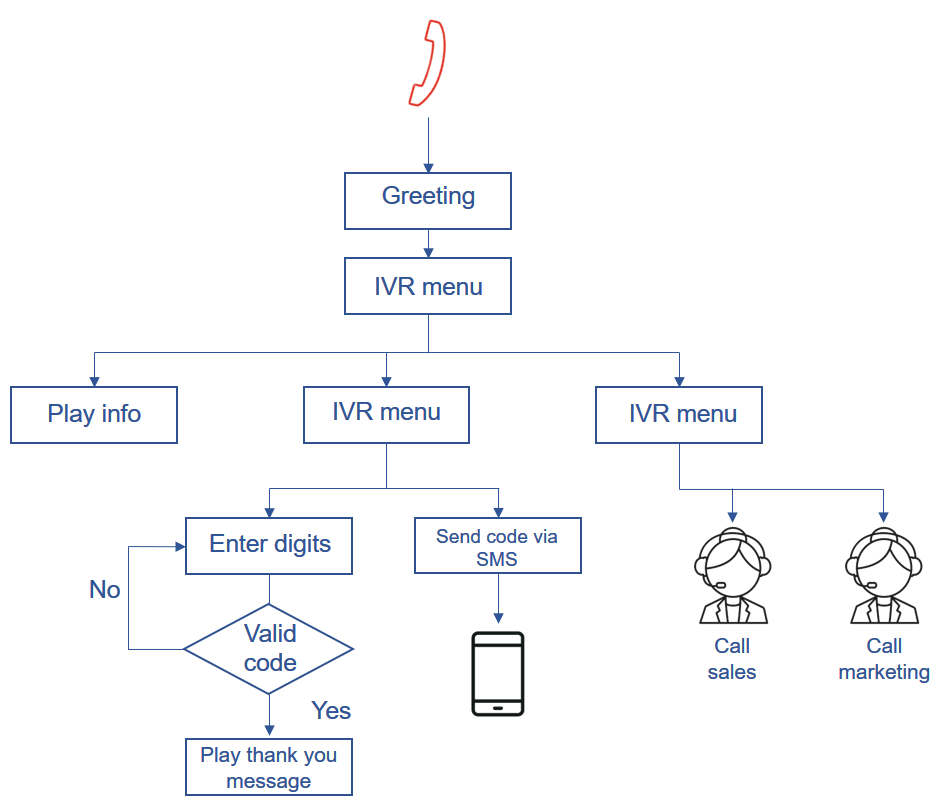
Can you see the pages in this?
Here we start with a simple greeting page, then move on to a simple IVR Menu, offering the caller a choice. If they choose option 1, they are redirected to a page that reads some text, then the call ends.
Option 2 leads to a second menu, offering the option enter a code they already have, or receive a new code by SMS. Option 1 of this menu moves to a page that allows them to enter their code, the code is verified and if correct the user thanked for validating their number, and the call is disconnected. Option 2 takes them to a web page that uses a web service to send an SMS message containing a new code, and the call is then disconnected.
Option 3 of the first menu goes to a second submenu, offering to connect to an agent. Option 1 of this menu opens a page that connects a second call to the Marketing department. When the call ends, the primary call is disconnected. Option 2 does the the same but connects to the Sales department. Here we present both options as separate pages, but you could simply pass the parameters in the URL of the IVR Menu and make these a single page.
Hopefully, this simple example has helped you to envisage how your REST application can be constructed, with each user interaction being a set of API Actions mapped to a page of your web service.
What Next
At this point you should dive into the API documentation, start with the HTTP Request and HTTP Response objects. These will give you the an idea of the top level actions. Then dip into the individual Actions to see what each one can do in more detail. Finally you should look into the web services and language wrappers that allow you to utilise other features of Aculab Cloud.